On September 22, 2026, I started receiving recorded calls claiming customers could not find my business on Google. Each interruption meant checking my phone for what might have been a real business call.
I built a call-screening workflow in DeanTek to put a keypad prompt before my cell rang. I named it “Spam call guardian.” Callers had one instruction: press 1 to connect.
I set up and tested the workflow at 12:32 p.m. that day. By 4:19 p.m., seven subsequent calls had taken the end-call path instead of reaching my cell. Here is the actual configuration, what I tested, and what those results tell us.
What happened during the first afternoon
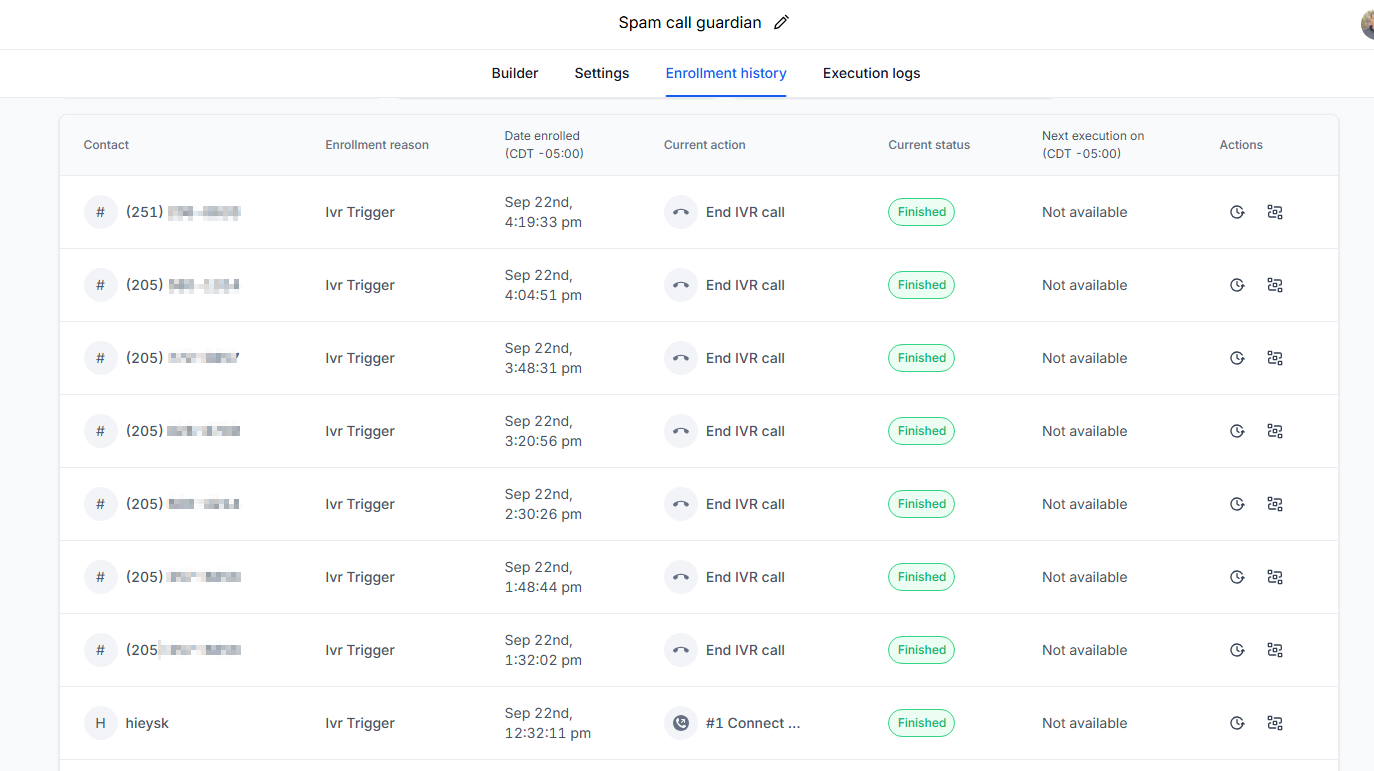
The enrollment history below shows my test contact, “hieysk,” reaching the Connect Call action at 12:32:11 p.m. I pressed 1 and confirmed that the call connected to my cell. I also tested the incorrect-key and no-input paths.
Seven later entries show End IVR call. Their enrollment times were 1:32, 1:48, 2:30, 3:20, 3:48, 4:04, and 4:19 p.m. All times shown are CDT on September 22.
The result I can document
Within four hours of my successful test, the workflow screened out seven calls before they reached my cell. Based on the unwanted calls that prompted the setup, I suspected these were more of the same.
What the log does not prove
The history documents routing, not caller identity. It does not independently prove that all seven callers were robots, and this screenshot does not display each caller's keypad input. My observation was that these callers did not press 1 within the input window. This is one afternoon of experience, not a long-term spam detection rate.
Be precise about calls claiming to represent Google
The calls that prompted this workflow made claims about customers being unable to find my business on Google. I did not verify who placed them. Mentioning Google in a recording does not establish that the caller works for Google.
Google provides guidance on protecting your business against fraudulent calls and texts. If a caller claims there is a listing problem, check your Business Profile directly instead of treating the recording as proof.
There is an important distinction: Google also describes legitimate automated calls to businesses, including calls to confirm business information or handle appointment requests. A keypad screen does not know which organization is calling. Consider that when deciding how strictly to handle callers who do not respond.
Before you change your business number's routing
Confirm where the incoming call lands
This example uses a business number available to the Start IVR trigger in my DeanTek account. The cell number is the destination after screening. Those are two different roles: the incoming business line starts the workflow, and my cell receives calls that pass.
Check which workflow or answering setup already handles the incoming number. Assign the number to one IVR workflow at a time so the intended screening flow handles incoming calls. Record your current routing so you can restore it if a test fails.
Choose the outcome for callers who do not respond
My configuration ends the call. That is a deliberate choice, not a requirement for every contractor. If your callers often need extra time or assistance, consider a longer window or a voicemail fallback instead. Those alternatives are not the configuration demonstrated in these screenshots.
Build the DeanTek press-1 screening workflow
The screenshots below show my actual setup. Use the settings together; changing only the greeting will not create the screening behavior.
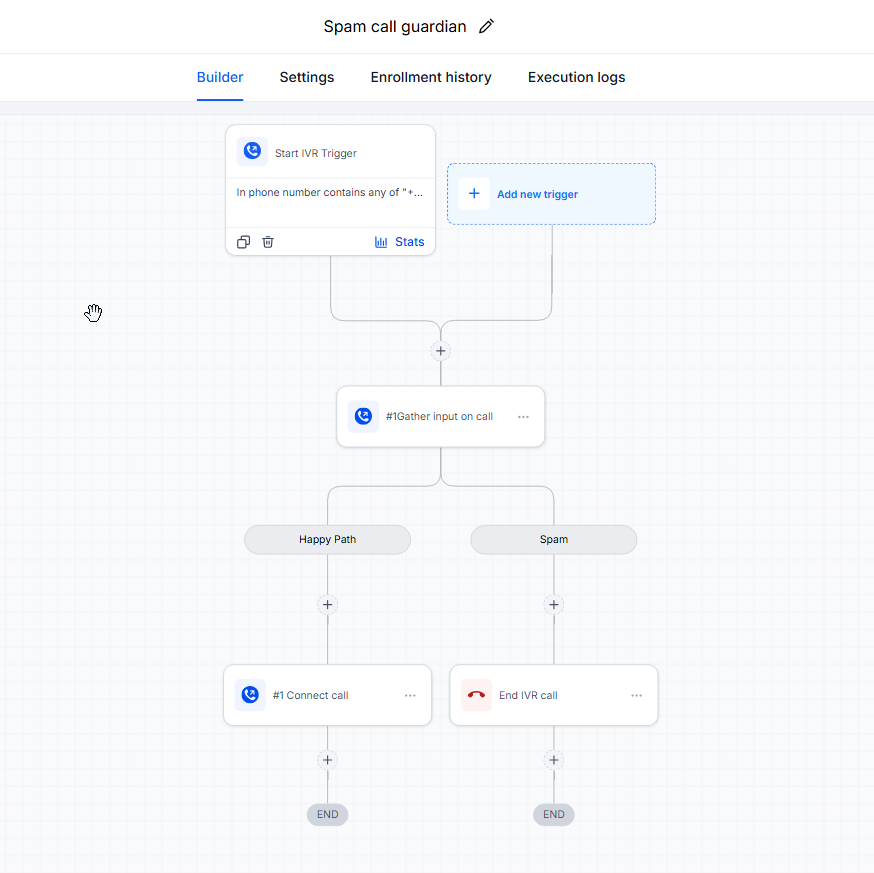
1. Add the Start IVR trigger
In Automation, create a workflow from scratch and add Start IVR. Select the incoming business number you want to screen, then save the trigger. My trigger is filtered to that business line. Do not put your forwarding destination in this field unless it is actually the incoming line you intend to configure.
2. Add Gather Input on Call
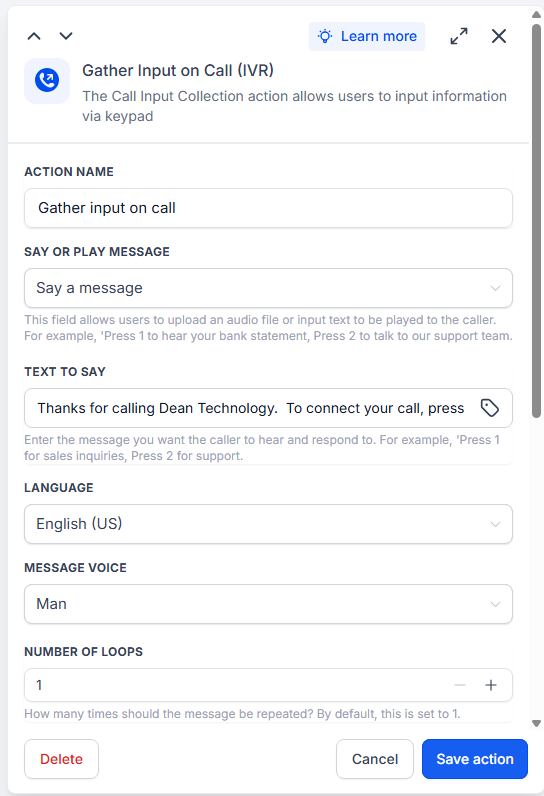
Add the Gather Input on Call (IVR) action. Select Say a message and enter a short greeting with your business name and the required key. For example:
Thanks for calling [Business Name]. To connect your call, press 1.
My screenshot shows English (US), the Man message voice, and one loop. Keep the instruction early and easy to hear. A long sales message would make callers wait before learning how to reach you.
3. Set the input window and digit count
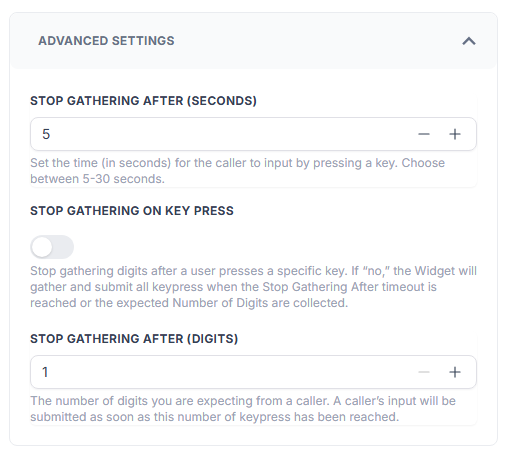
Open Advanced Settings and match these values:
- Stop Gathering After (Seconds): 5.
- Stop Gathering on Key Press: off.
- Stop Gathering After (Digits): 1.
The one-digit setting matters. A caller only needs to send one digit to complete collection; the matching condition decides whether it is the right digit. The separate keypress toggle does not need to be on for this documented configuration.
Five seconds is the input timeout, not a promise that the entire call lasts five seconds from dialing. The caller also has to reach the workflow and hear the greeting.
4. Match the digit 1
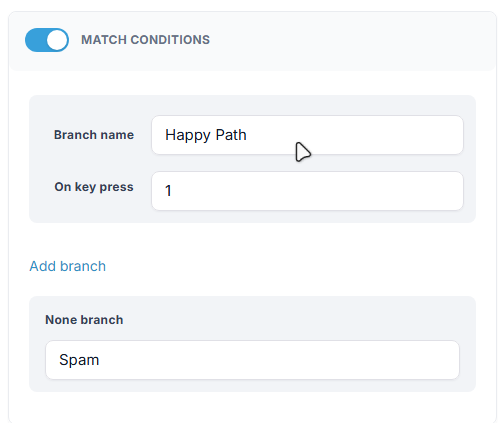
Turn on Match Conditions. My matching branch is named Happy Path, with On key press set to 1. The None branch is named Spam and catches input that does not match.
“Spam” is just the label I gave that branch. It is not an automated classification or a verdict about the caller. A descriptive name such as “No valid input” would work too.
5. Connect the matching branch to your cell
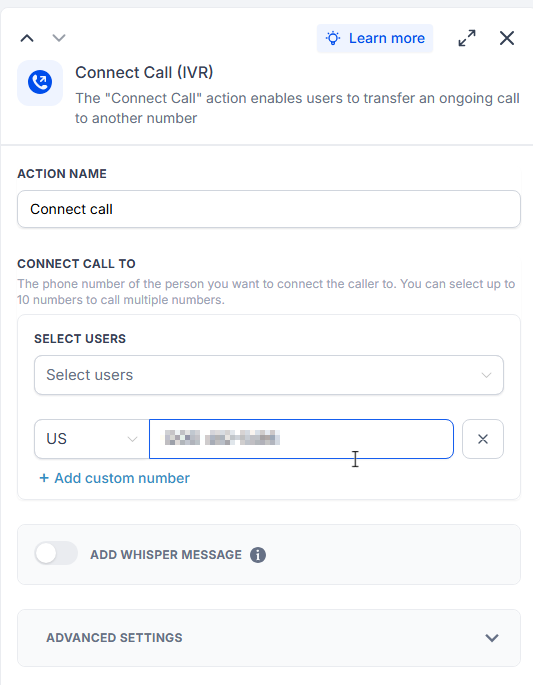
Under Happy Path, add Connect Call (IVR). My setup uses a custom number for my cell, with Add Whisper Message switched off. Enter the number you actually want to answer on and save the action.
6. End the unmatched call
Under the None branch, add End IVR call. In my tests, an incorrect digit ended the call, and no input ended it after the input window expired. There is no retry or voicemail step in this branch.
Save your changes and publish the workflow when you are ready to make live test calls. Keep the workflow open while testing so you can inspect which action each call reaches.
Test all three outcomes before relying on it
Call the business number from another phone. Hearing the greeting is only the first check. Follow each path and confirm what happens at the destination.
| Test | Expected result | Check |
|---|---|---|
| Press 1 | Call forwards to your cell | Answer and confirm two-way audio |
| Press another digit | Call ends | Your cell does not ring |
| Do not press a key | Call ends after the input window | Your cell does not ring |
Also test what happens when you cannot answer
Press 1, then leave the forwarded call unanswered. Check where the customer lands and whether voicemail behaves as intended. The screenshots document my connection destination, but not its expanded advanced settings or an unanswered-call fallback. Do not infer those settings from this example.
Compare the phone experience with the logs
Use enrollment history to locate the test, then inspect execution details if the outcome differs from what you expected. A Finished label tells you the workflow finished; actually answering the forwarded call is what verifies that the connection works.
Protect your time without making customers struggle
A plumber handling a leak or an HVAC technician diagnosing a failed system has a good reason to reduce interruptions. But the next unknown number could be a homeowner who needs that same service.
Imagine a customer holding a flashlight under a leaking sink. They hear your greeting, move the phone away from their ear, and look for the keypad. A short timeout may end the call before they respond. That is why five seconds should be a tested choice for your audience, not a setting you copy without listening to the experience.
Ask someone unfamiliar with the setup to call. Watch for confusion, accidental keypresses, language barriers, and accessibility needs. If legitimate callers struggle, change the timeout or fallback and repeat the tests.
This screen can filter basic recordings that do not react to the prompt. A live salesperson or an automated caller able to send 1 may still get through. Review results over time, including whether real customers report trouble reaching you.
Make screening part of your lead-response process
Screening happens before the call reaches you. Missed-call text-back addresses a different moment: a customer tries to reach you and you cannot answer.
If you combine the two, test the interaction. Check whether ending an IVR call starts any existing missed-call automation, and decide whether that is intended. Automatically texting every screened-out number could create follow-up you did not want.
For callers who do connect, keep the next step clear: answer, return a missed call, or collect the details needed to book the job. Our contractor lead-response guide covers that follow-up process, and the missed-call text-back feature page explains DeanTek's related offering.
My first-afternoon result was straightforward: a working press-1 connection path and seven later calls that ended before reaching my cell. That gives me a useful starting point to monitor and refine, while keeping real customer access at the center of the setup.
Want help reviewing how your business handles incoming calls and missed leads? Walk through your current setup with DeanTek.
Discuss Your Call Workflow